I have been asked for some photos f the 40 Chevy before I started to work on it.. So here they are.. First photos are from the 80s I think, before mu Aunt had it repaired the last time.
Enjoy.
As you can see, it was in pretty rough shape to start with. If you can zoom in, the license plate was 1963, the LAST time it was on the road.
This is what it looked like when I finally brought it home.
NOT too bad, but, I thought I could do better.
Yes, that is our cat Joe trying to get into the picture.
The "Body" looked pretty good before I started, but I knew what I was going to find when I removed all the silver paint.
The rest of this blog shows just what I have gone through so far. The body is currently in a dip tank, and should be out in a couple weeks. When I get it back, there will be ZERO paint, Bondo, or rust on it. It will be like brand new steel. Yes, all the rust HOLES will be there, but the rust will be stopped.
Total Pageviews
Monday, September 24, 2012
Friday, September 14, 2012
So, I showed up at Pennsylvania Metal Works in Monaca, PA
to give Jerry a hand moving my car into the paint stripper. I brought
Brian to help in case we had something heavy to move. When we got
there, my 40 Chevy was once again sitting in a field. While this is not
what I want to see, I understand that a little rain is not going to
hurt it now.
First think we had to do was clear a way
through the shop for the fork lift. Not much to move. He has a 1965
Mustang Fastback there that JUST cleared the forklift. (Don't worry, the
Mustang is WORSE than the 40 Chevy)
Next we had to put
the 40 on the forklift. Jerry has 2 LONG forks he slides on the lift
for lifting bodies. They work pretty well, if you have a floor to lift.
Body is on the forklift headed back into the shop.
Jerry is driving, have to go slow as there isn't much floor left to support the body.
I brought Brian to help. We now needed the crane to get the body off the forklift.
Nice trunk floor.
Jerry had to drill some holes in the body to let the air out of pockets. I REALLY hated to see this happen.
We then placed the body into a rack. Now the whole mess can be dropped into the paint stripper.
We needed to lift it about 20 feet up to clear everything in the shop as we head to the stripper.
All you can see is the center of the roof. The rest of the body in IN the tank. It is actually floating right now.
Brian watching it float. We are waiting for the air to get out of the ONE 1/4 hole that was drilled.
It was slow, but it finally sank under the solution. It may come out in a week or so. Lots of paint needs to be softened before it can be washed.
OK, It has been a while. I did get the doors back from the stripper. All clean and shinny. With major rust holes. I will need to learn a lot about welding to be able to repair them.
Yes, bare steel and yes, major hole on bottom.
The bottom of this one is completely gone. I believe it is the left rear. I can't fill that one with Bondo.
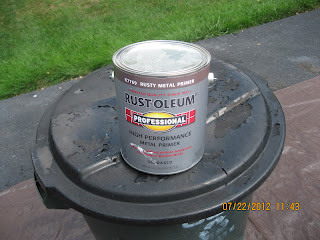
When I got then home, I primed them with Rust-Oleum Professional High Performance Enamel Primer (http://www.rustoleum.com/CBGProduct.asp?pid=158). I was worried that after I applied this primer, I would not be able to use Acrylic Lacquer paint on the car. After and Email to Rust-Oleum, they assured me that I can.
This really the can of paint that I used. Straight from Home Depot. http://www.homedepot.com/
Here are the doors after I got the primer on.
YES, I applied all the primer with a BRUSH. Looks like I have a lot of sanding to do as well.
I also primed a fender that I had here. Not sure I will use these fenders, but I have them.
Both fenders are right rear. One has a fuel filler and one doesn't. The one I need, has a fuel filler hole, but is rusted out pretty badly. The one without is pretty nice, but, no hole.
As you can see from all the photos, this was done late July. I failed to get these posted then. I have lots more work to do now.
Ed
Subscribe to:
Posts (Atom)


.JPG)
.JPG)
.JPG)
.JPG)
.JPG)
.JPG)
.JPG)
.JPG)
.JPG)
.JPG)
.JPG)
.JPG)
.JPG)
.JPG)

.JPG)
.JPG)
.JPG)
.JPG)
.JPG)
.JPG)
.JPG)
.JPG)
.JPG)
.JPG)
.JPG)